|
Author: Skip
To get access to the clock light, do the following:
- Remove the two air direction slider knobs on the heater controls face plate (leave on the round knobs).
- Very carefully remove the heater controls face plate by prying on the SIDE edges. I used a tile knife, but any very thin, yet strong knife or screwdriver should work (this plate is held on by being clipped over lugs on the plastic plate behind it). The plastic plates are very thin so be very careful. Resistance should be minimal!
- Open the passenger door and remove the screw on the black triangle plastic plate on the side of the dash. Two additional screws on the far right edge of the strip housing the clock should now be visible and should also be removed.
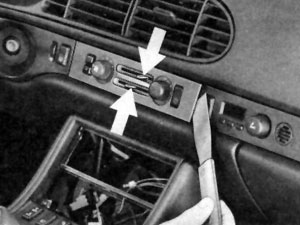
- Remove the small round plastic air vent/thermostat opening with a small coin (or large screw driver) by turning counterclockwise.
- Using a small, flat screwdriver remove the small rectangular plastic cover plate next to the passenger side vent by prying it free (notch appears at bottom of plastic cover). The two screws under this small plate can now be removed.
- All remaining screws should now be exposed that hold the plastic plate covering the clock. Actually, the clock is screwed to the back of this plate.
- Pull out the heater controls unit about 2 inches (5cm) so that the plastic plate covering the clock can be pulled out.
- Using a thin knife or small screwdriver, very carefully pry this plastic off. REMEMBER, all the plastic plates can snap very easily but, when correctly levered, pull off with minimal resistance.
- The bulb protrudes from the back of the clock. It unscrews from the back of the clock with a 1/4 turn.
NOTE: When you take the long plate off, the auto a/c temp sensing tube may come off the back of it (it did on mine) if so, you will probably have to take the glove box off to refit.
Illustrations:
Application: 85.5-95 944/968
Parts: 944.641.900.00 - clock bulb
Credits: Mark Forder
| Related Articles |
> Window Express Kit Installation
> AC Delete
> Accusump Installation
> Adjustable Ride Height Kit - Paragon
> Alternator Replacement
> Brakes, front - 924S, 944, 944S
> Brey-Krause Strut Brace Installation - 944
> Camber Plate Installation (Paragon)
> Clutch Replacement - Part One
> Clutch Replacement - Part Two
> Clutch Slave Bleeder Valve Remote
> Control Arm Bushing Upgrade - Weltmeister
> Control Arm, Front - Info
> Coolant Flush
> DME Chip Installation
> Dash Replacement
> Engine Identification
> Engine Production
> Fuel Level Sender
> KLA Strut Brace Installation - 924S, 944, 968
> Koni Strut Conversion - 8641-1414S for late 944, 968
> Motor Mount Replacement
> Odometer Gear Replacement - late 944
> Oil Cooling, Auxiliary
> Oil Pressure Relief Valve
> Oil Pressure Sending Unit Replacement
> Rear Ride Height Adjustment
> Porsche Chronology
> Rear Spring Rates vs. Effective Rates
> Rear Wheel Bearing Diagnosis
> Rear Wheel Bearing Replacement - 924, early 944
> Rear Wheel Bearing Replacement - late 944, 968
> Ride Height Measurement
> Rod Bearing Replacement
> Shift Lever Rebuild
> Short Shift Kit
> Throttle Position Sensor
> Sway Bars - Info
> Torque Tube Rebuild
> Torsion Bar Replacement
> Transaxle Fluid - Info
> Transaxle Fluid Change
> Rear Sway Bar Installation
> Transaxle Replacement
> Heater Clip
> Window Regulator Replacement
> Seat Back Brace Installation Instructions
> KLA Strut Brace Installation - 968/944 S2/944 S
|
|
