|
This procedure is specifically for the installation of a 968 M030 Sway Bar but also applies to any 924/944/968 factory sway bar.
The best (easiest) way to remove or install the sway bar is with the rear suspension neutrally loaded... meaning it is equally compressed as expanded. This can be accomplished by jacking the car only slightly, or, by somehow blocking under the wheels. For best results, do not tighten the mounting nuts and bolts until the suspension is fully compressed. This can reduce any preloading of the sway bar, which in most cases is not desirable. Also, it may help to use silicone spray on the rubber bushings to ease the final fit.
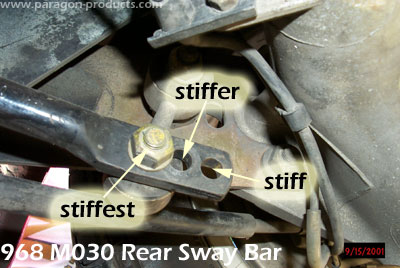
The 968 M030 rear sway bar is adjustable for stiffness via 3 lateral bolt holes on the trailing edges. The inner-most bolt hole is the stiffest setting.
Installation:
- Install the mid-bar bushings to the sway bar. (These split bushings are a very tight fit... this is normal and necessary. They will compress into the mounting apparatus once adequate pressure is applied.)
- Using the clamps, attach the bar to the torsion carrier. Do not tighten.
- If installing new drop links, the top attaches to the backside of the camber eccentric.
- With drop-links loose at the top, line up and install the lower bolt attaching the sway bar to the drop-link. Do not tighten.
- With all attaching points fairly free to rotate, lower the car and allow the suspension to settle.
- Tighten all points of installation according to torque settings listed in the Factory Manual (see illustrations below)
Note: If your car does not have a rear sway bar you'll need some additional parts:

| Number |
Name |
Quantity |
Part# |
| 8 |
bushing |
2 |
477.411.313.F |
| 9 |
clamp |
2 |
113.411.333 |
| 10 |
bolt |
4 |
N.010.240.11 |
| 11 |
washer |
4 |
N.012.008.6 |
| 12 |
drop-link |
2 |
477.511.051.A |
| 13 |
eccentric bolt |
2 |
477.511.515 |
| 14 |
washer |
2 |
N.011.531.5 |
| 15 |
nut |
2 |
N.022.141.4 |
| 16 |
washer |
4 |
900.025.008.09 |
| 17 |
nut |
4 |
N.022.149.2 |
| 18 |
bolt |
2 |
N.010.452.4 |
|
*these may be purchased as a complete kit from Paragon Products |
Illustrations:
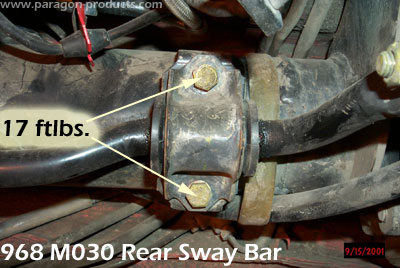
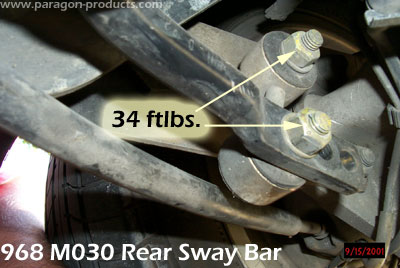
Torque: drop link = 34 ftlbs, clamp = 17 ftlbs
Credits: Skip Grehan
| Related Articles |
> Window Express Kit Installation
> AC Delete
> Accusump Installation
> Adjustable Ride Height Kit - Paragon
> Alternator Replacement
> Brakes, front - 924S, 944, 944S
> Brey-Krause Strut Brace Installation - 944
> Camber Plate Installation (Paragon)
> Clock/Bulb Replacement, digital, Late 944 and 968
> Clutch Replacement - Part One
> Clutch Replacement - Part Two
> Clutch Slave Bleeder Valve Remote
> Control Arm Bushing Upgrade - Weltmeister
> Control Arm, Front - Info
> Coolant Flush
> DME Chip Installation
> Dash Replacement
> Engine Identification
> Engine Production
> Fuel Level Sender
> KLA Strut Brace Installation - 924S, 944, 968
> Koni Strut Conversion - 8641-1414S for late 944, 968
> Motor Mount Replacement
> Odometer Gear Replacement - late 944
> Oil Cooling, Auxiliary
> Oil Pressure Relief Valve
> Oil Pressure Sending Unit Replacement
> Rear Ride Height Adjustment
> Porsche Chronology
> Rear Spring Rates vs. Effective Rates
> Rear Wheel Bearing Diagnosis
> Rear Wheel Bearing Replacement - 924, early 944
> Rear Wheel Bearing Replacement - late 944, 968
> Ride Height Measurement
> Rod Bearing Replacement
> Shift Lever Rebuild
> Short Shift Kit
> Throttle Position Sensor
> Sway Bars - Info
> Torque Tube Rebuild
> Torsion Bar Replacement
> Transaxle Fluid - Info
> Transaxle Fluid Change
> Transaxle Replacement
> Heater Clip
> Window Regulator Replacement
> Seat Back Brace Installation Instructions
> KLA Strut Brace Installation - 968/944 S2/944 S
|
|
