|
Parts needed:
Moly GreaseProcedure:
- Lift rear or entire vehicle SAFELY!
- Release handbrake
- Remove the rear wheels.
- Remove the rear brake calipers.
- Remove the brake drum/disk.
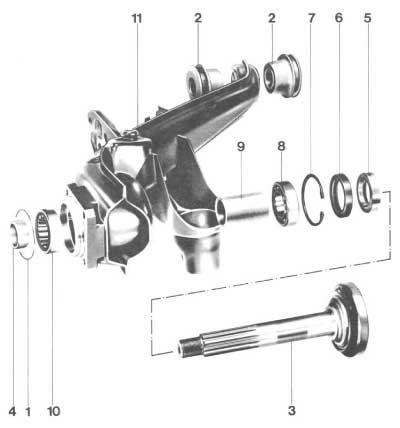
- Remove the cotter pin and use an air driven impact wrench to remove the stub axel nut (castle type). This nut is torqued to about 350 ft/lbs and requires a 36mm socket.
- Remove the hub. You may have to give this a whack with a mallet.
- Use a (8mm?)12 point "Cheese head" Allen wrench to remove the CV joint bolts.
- Move the axel/CV joint out of the way. Support the CV joint with nylon tie wraps, twine, what ever.
- Remove the rear dust shield.
- Remove the outer bearing cap.
- Pull the stub axel out of the trailing arm. You may need to use a gear puller, or drift it out using a hammer and a section of 2"x4" lumber. A soft faced mallet will also work.
- Use a screw driver to carefully pry out the inner and outer bearing seals.
- Use snap ring pliers to remove the inner bearing snap ring.
- Use a drift punch, or a small piece of wood (Maple is excellent) to drive out the bearings.
- Remove ALL of the grease from the bearing box and repack with fresh grease.
- Pack and install the bearings (Don't forget the inner bearing snap ring!). You will have to use a hammer and drift to seat the bearings.
- Install new seals and reinstall the bearing caps and dust shields.
- Install the stub axel.
- Install the hub and the stub axel nut. Torque to about 350 ft/lbs.
- Install a new cotter pin.
- Install the drum/disk.
- Install the calipers, brake pads, and then bleed the brakes.
- Reinstall the rear wheels, lower the car, and enjoy the peace and quiet.
Images:
Torque: (ft lbs) Castle Nut = 280 + 52, Brake backplate to Trailing arm = 43, Brake caliper to backplate = 63, CV bolts = 31, Lug nuts = 96
Application: 924, 924S, 944 (83-85.1)
Credits: Cliff Hipsher
| Related Articles |
> Window Express Kit Installation
> AC Delete
> Accusump Installation
> Adjustable Ride Height Kit - Paragon
> Alternator Replacement
> Brakes, front - 924S, 944, 944S
> Brey-Krause Strut Brace Installation - 944
> Camber Plate Installation (Paragon)
> Clock/Bulb Replacement, digital, Late 944 and 968
> Clutch Replacement - Part One
> Clutch Replacement - Part Two
> Clutch Slave Bleeder Valve Remote
> Control Arm Bushing Upgrade - Weltmeister
> Control Arm, Front - Info
> Coolant Flush
> DME Chip Installation
> Dash Replacement
> Engine Identification
> Engine Production
> Fuel Level Sender
> KLA Strut Brace Installation - 924S, 944, 968
> Koni Strut Conversion - 8641-1414S for late 944, 968
> Motor Mount Replacement
> Odometer Gear Replacement - late 944
> Oil Cooling, Auxiliary
> Oil Pressure Relief Valve
> Oil Pressure Sending Unit Replacement
> Rear Ride Height Adjustment
> Porsche Chronology
> Rear Spring Rates vs. Effective Rates
> Rear Wheel Bearing Diagnosis
> Rear Wheel Bearing Replacement - late 944, 968
> Ride Height Measurement
> Rod Bearing Replacement
> Shift Lever Rebuild
> Short Shift Kit
> Throttle Position Sensor
> Sway Bars - Info
> Torque Tube Rebuild
> Torsion Bar Replacement
> Transaxle Fluid - Info
> Transaxle Fluid Change
> Rear Sway Bar Installation
> Transaxle Replacement
> Heater Clip
> Window Regulator Replacement
> Seat Back Brace Installation Instructions
> KLA Strut Brace Installation - 968/944 S2/944 S
|
|
