
|
|
|
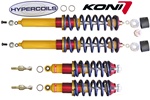
Koni Adjustment Procedures Last Updated: 11/16/2010 |
|||
|
Author: Skip
NOTE: Do not place shock absorber in a vice (except at the lower eye).
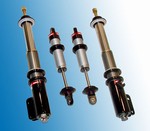
Rebound Adjustment The rebound adjuster requires a pin with an outside diameter of 3mm or a 2.5mm Allen key. If higher rebound forces are desired, put the adjuster pin next to the minus sign and turn the pin towards the plus sign. This is one sweep of adjustment. From the minimum position there is a total adjustment range is 6-8 sweeps. There are no specific clicks of adjustment to mark the adjustment position, the rebound adjuster can be placed at any in the adjustment range. DO NOT FORCE ADJUSTER AS BINDING MAY RESULT! Compression Adjustment 1. The adjustment is made with the shock fully extended. 2. Hold the shock body where the piston rod emerges from the cylinder. Depress the button fully, and hold it down while adjusting. 3. The adjuster has 10 distinct stops (clicks), each of which marks an adjustment position. 4. The shock may have been adjusted previously. Check if the shock is in the zero-position by turning the piston rod clockwise until the zero-stop is felt. DO NOT FORCE! 6. To increase compression damping, turn the piston rod counter-clockwise. 7 . While the button is depressed, do not turn the piston rod further, otherwise correct adjustment will be disturbed. Release the button and make sure that the adjusting button springs fully back into position. As soon as the button is back in position, the piston rod may be turned freely. NOTE: Do not place shock absorber in a vise (except at the lower eye). The rebound and compression adjuster requires a pin with an outside diameter of 1.5mm or a 1.5mm hex key. The adjusters are marked with letters that are stamped on the mounting eye. Rebound Adjustment 1. The rebound adjuster is marked with an R (rebound). To increase the rebound force, put the adjuster pin next to the minus sign and turn the pin towards the plus sign. 2. The adjuster has 7 distinct stops (clicks), each of which marks an adjustment position.There are a total of 8 adjustment positions. 3 The rebound adjuster has a positive stop on the minimum and maximum position. DO NOT FORCE ADJUSTER AS DAMAGE MAY RESULT! Compression Adjustment 1. The compression adjuster is marked with a B (bump). To increase the compression force, put the adjuster pin next to the minus sign and turn the pin towards the plus sign. 2. The adjuster has 7 distinct stops (clicks), each of which marks an adjustment position. There are a total of 8 adjustment positions. 3. The compression adjuster has a positive stop on the minimum and maximum position. DO NOT FORCE ADJUSTER AS DAMAGE MAY RESULT! EXTERNALLY ADJUSTABLE 8041, 8210, 8241, 8610, 8641, 8710, 8741 Series These shocks can be adjusted while mounted to the car. Adjustment by Knob 1. Place the supplied adjusting knob onto the adjuster tab on the top of the shock absorber. 2. Turn the adjusting knob clockwise to check if the damper has been previously adjust-ed. If you feel resistance, do not force, as the shock is in the minimum position. 3. To increase the rebound damping force, turn the knob counter-clockwise in the direction of the "firm" arrow. To decrease the rebound damping force, turn the knob clockwise. 4. After adjustment remove the adjusting knob to prevent damage to the adjuster.
STANDARD ADJUSTABLE 80, 82, 86, 8040, 8240 Series 1. Remove the shock absorber from the vehicle and hold it vertically with the lower mounting attachment in a vise. 2. Fully compress the shock absorber, at the same time turning the dust cover or piston rod slowly counter-clockwise, until you feel the adjuster engage into the recesses of the foot valve assembly. NOTE: Some shock absorbers include a bump rubber concealed under the dust cover and this must be removed prior to adjusting. Do not forget to re-install after adjusting.
3. The shock may have been adjusted previously. Therefore, check whether the shock absorber is in the unadjusted position by keeping it compressed and gently turning further counter-clockwise while counting the half turns until a stop is felt. This is the minimum rebound position. 4. To increase the rebound damping, turn the piston rod clockwise. The typical adjustment range is 3-5 half turns. 5. Extend the shock absorber vertically for at least 3/8" without turning in order to disengage the adjusting mechanism. The dust cover or piston rod may now be turned freely.
|

 28 Series
 Sport (Yellow)
