|
The following is a brief overview of the installation process for 901/915 transaxles. 901 users must obtain a 915 shift housing. Complete instructions are included with the kit. Installation time is approximately 1-2 hr.
|
|
|
1. |
Remove the shift housing boot or slide it all the way to the top near the gear shift knob to access the upper shift housing area. |
|
|
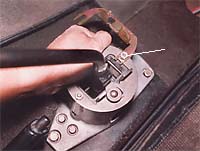
2. |
Remove the forward nut from the top carrier plate, then install the Gate Shift kit carrier plate. Reinstall the nut. |
|
|
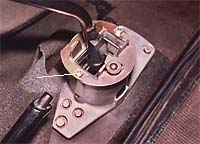
3.
|
Remove the rear carrier plate nut, swing the Gate Shift kit carrier plate into position, then reinstall the nut
|
|
|
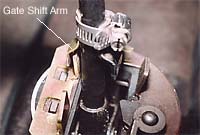
4. |
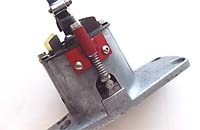
Install the Gate Shift arm on the shift lever using the supplied clamp, then adjust engagement between arm and carrier plate "tabs".
Note: The clamp provided in the kit allows temporary positioning of the Gate Shift Arm on the shift lever. We recommend tack welding the arm in place after initial installation and adjustment. |
|
|
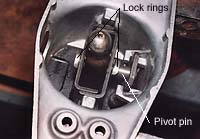
5. |
Remove shift housing from vehicle, then discard the factory pivot pin. Replace with the Gate Shift kit pivot pin.
Note: For housings equipped with the factory short shift kit only: Elongate the access hole on the side of the shift housing. |
|
|
6. |
Install the Gate Shift Tension Plate assembly:
Drill 2 mounting holes, then install the Tension Plate assembly using the supplied hardware. |
|
|
7. |
Adjust the tension bolt-to-pivot pin clearance. |
|
|
8.
9. |
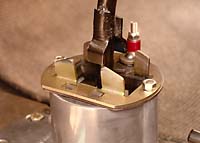
Reinstall the shift housing assembly on the vehicle.
Test drive vehicle and make final adjustments. Note:
We suggest tack welding (MIG or TIG) the Gate Tab to the shift lever. To ensure the Gate Tab doesn't move, Remove the entire shift housing assembly from the vehicle and weld the tab onto the lever. Full instructions in the kit. |
|
|
10. |
The shift housing boot will require a modification to provide adequate clearance for the shift mechanism. Modify the shift boot as follows:
Using a sharp utility knife, cut a 25mm horizontal slit through the boot as indicated by the red line. Cut along the 7th "fold" of the boot (counting from the bottom fold). |
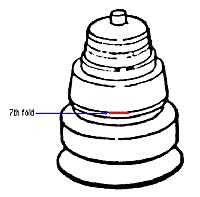 Factory shift housing boot modification Factory shift housing boot modification |
|
11. |
Install the shift housing boot as follows: a. Install the boot while guiding the top of the tension plate assembly oothrough the slit. b. Pull the bottom of the boot as far down as it can go over the housing. Note:
Verify the boot doesn't interfere with the shift mechanism. Aftermarket leather shift boots may provide adequate clearance without additional modifications. ..... or simply leave the shift boot off (see photo). |
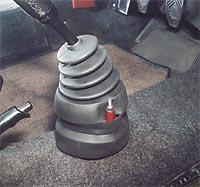
Modified factory rubber shift boot installed over shift housing ...... 
.... or use without a shift boot. |