|
|
|
Adjustable Ride Height Kit - Paragon Last Updated: 04/09/2013 |
|
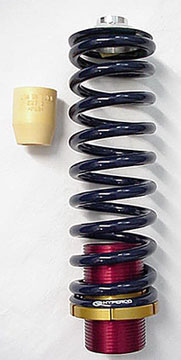
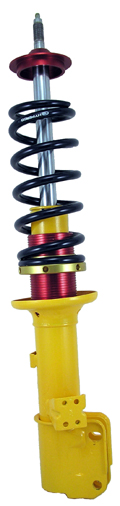
Items Included:
Optional Items:
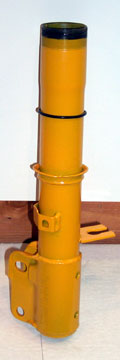
Application: The 944 Adjustable Ride Height Kit fit all 924, 924S, and 944 that feature a rebuildable strut and all KONI or KONI converted (8641-1414S) sealed front struts on 944, 944S2, 944Turbo, and 968. This kit cannot be used on Sachs sealed struts that have not been modified for use with KONI 8641-1414S strut inserts (cut-n-drill method). Installation: After removing the stock spring, bump rubber and dust cover, clean the strut tube to remove any dirt or undercoating buildup. The threaded collar will slide over the top of the strut tube, and bottom out on the stock lower perch. Test for fit. By necessity, the threaded collar must be a little larger than the strut tube in order to slide on. Because of this, we have included two O-rings (one for each strut) that will allow your new threaded collar to fit snuggly. Once the threaded collar is verified to fit, remove it and place an O-ring approximately half-way between the top of the strut and the lower perch. Then, push the threaded collar down over the O-ring until the threaded collar bottoms out on the lower perch (installing the threaded lower perch onto the threaded collar will help you push). The O-ring will walk up the inside of the threaded collar, effectively locking it in place.
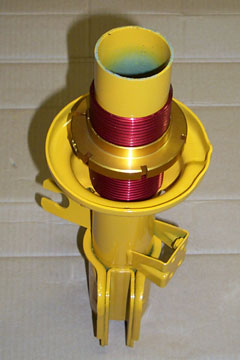
Some owners may wish to remove the stock lower perch from strut. This allows full and unimpeded travel of the threaded lower perch, and may also allow for use of oversize wheel/tire combinations. Removing the stock lower perch can be done with a cutting torch, grinder, or cutoff tool. Be sure to leave enough material on the strut to allow the threaded collar to seat on safely and evenly - no more than 1/4" is really necessary. Next, place the new lower spring perch (gold) on the threaded collar (if not already there from above). To start, position it in the middle of the collar. The lower perch has an Allen head set screw that will lock the perch in place (by pinching) once the desired ride height has been achieved. You may not want to lock the perch in place yet, as there may be some fine tuning to be accomplished to get to a proper and level ride height.
If you purchased helper springs, they will sit on top of the lower perch under the new main springs. Helper springs are not required - they are there simply to keep tension on the suspension when lifted. The upper spring perch has two holes that should be used to safety-wire or tie-wrap the perch to the top of the spring. Koni Competition Bump Rubbers must be used with this kit, as the original bump rubber and dust boot will not fit inside the new 2.5" ID springs. No dust boots are used with this kit, as most dust boots are largely ineffective. Slide the rubber onto the strut shaft. A small amount of grease (moly) will allow the bump rubber to slide on with relative ease.
Finally, place the spring and upper perch on the strut. Insert the strut shaft up through the upper strut bearing and torque the top nut to factory specifications.
Once complete, check for proper ride height and level. Remember, lowering a car to the ground may not compress the suspension to its final resting position. A short drive will settle the suspension so proper measurements and adjusments may be made. 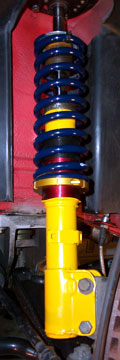 Here are the Instructions Provide with the Adjustable Ride Height kit:
Items Included Qty Item 2 Suspension Spring 2 Aluminum Threaded Collar 2 O-Ring 2 Lower Spring Perch 2 Upper Spring Perch 2 Koni Competition Bump Rubber Optional Items *Helper Springs *Camber Caster Plates The 944 Adjustable Ride Height Kit fits all 924, 924S and 944s that feature a rebuildable front strut. All Koni sealed struts and all Sachs sealed front struts that have the Koni insert on 944, 944S2, 944 Turbo and 968. After removing the stock spring, bump rubber and dust cover, clean the strut tube to remove any dirt or undercoating buildup. Your threaded collar will slide over the top of the strut tube and bottom out on the stock, welded on lower spring perch. Test for fit. By necessity, the threaded collar must be a little larger than the strut tube in order to slide on. Because of this, we have included two o-rings (one for each strut) that will allow your new threaded collar to fit snuggly. If you have test fit the threaded collar, remove it from the strut and place the o-ring on the strut tube, approximately half way between the top of the strut tube and the stock welded on lower spring perch. Then push the threaded collar down over the o-ring until the threaded collar bottoms out on the stock lower spring perch (installing the lower spring perch on the threaded collar will help you push). The o-ring will walk up inside the threaded collar and will effectively lock it in place once it is fully seated on the stock lower perch. Some owners may wish to remove the stock lower spring perch for additional tire clearance. Although this can be done, some portion of the stock perch must remain in place to support the threaded collar. Next, place your new lower spring perch (gold) on the threaded collar. To start, position it in the middle of the threaded collar. The lower perch has an allen head set screw that will lock the perch in place once the desired ride height has been achieved. You may not want to lock the set screw at this point, as, no doubt, you will want to fine tune the ride height of your car once everything has been installed. If you have purchased helper springs, they will sit on top of the lower spring perch, underneath your new main springs. The 944 Adjustable Spring Perch Kit must be used in conjunction with Koni Competition Bump Rubbers as your stock bump rubber and dust cover will be too large to fit inside the 2.5 inside diameter spring used in this kit. No dust cover is used with this kit as most dust covers are largely ineffective. Slide the bump rubber onto the shock shaft. A small amount of grease will allow the bump rubber to slide on with relative ease. Part # 944ARHK
|