|
Author: Skip

Installation:
- Open hood to gain access to the strut bearing mounting nuts.
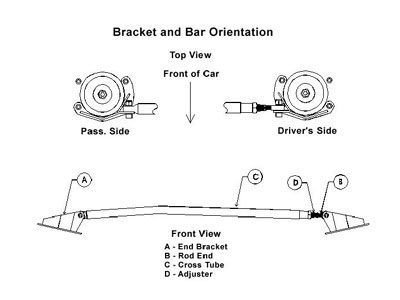
- There are (4) 13mm. strut bearing mounting nuts per side. Remove the (2) front and (1) inner rear and washers from each side. (See top view orientation below.)
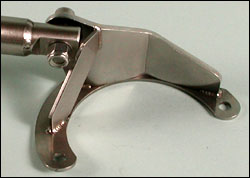
- Install end brackets (2) as shown below. Torque nuts to factory specifications.
- Install the solid end of the cross tube to the passenger side end bracket using the hardware supplied. Leave the bolt loose enough to move the cross tube up and down. (Note the proper orientation of the bar to the bracket shown below.)
- Lower the cross tube into position with the driver side end bracket. (Note: on turbo cars notching of the heat shield is necessary. The location and depth of the notch will become obvious as you attempt to lower the bar into place. Notch using tin snips or similar cutting device.)
- Adjust the length of the tube by holding the rod end and rotating the adjuster. Adjust until the fastener slides freely through the hole in the end bracket and the rod end. Install fastener with washers and nut supplied.
- Tighten passenger side cross tube fastener.
- We recommend pre-loading the brace by rotating the adjuster 1/2 turn in the direction which lengthens the tube.(Be careful, you can rotate the adjuster several turns with little resistance and put enormous force on the strut towers. Therefore do not exceed 1/2 turn from the neutral position.)
- Tighten the jam nuts on the rod end and the adjuster.
- Check the bar for interference with the fuel rail cover.(There should be about 1/4" clearance on 944/ 944-T models and about 1/16" clearance on 944-S models.) Also check for interference with throttle linkage, A/C lines etc.
- Carefully close the hood noting any abnormal resistance. Do not force the hood, if interference occurs, re-check your installation procedure,
Note: On some '85,' 86 models, the valve cap on the low pressure side A/C line may interfere with the rod end and the adjuster. Replacing the cap with a standard 1/4" valve cap, (available from any heating & air conditioning supply house), should solve the problem.
Illustration:
Application: (R-1520, R-1521, R-1522) 924S, 944, 944S, 944 Turbo
Credits: Brey-Krause
| Related Articles |
> Window Express Kit Installation
> AC Delete
> Accusump Installation
> Adjustable Ride Height Kit - Paragon
> Alternator Replacement
> Brakes, front - 924S, 944, 944S
> Camber Plate Installation (Paragon)
> Clock/Bulb Replacement, digital, Late 944 and 968
> Clutch Replacement - Part One
> Clutch Replacement - Part Two
> Clutch Slave Bleeder Valve Remote
> Control Arm Bushing Upgrade - Weltmeister
> Control Arm, Front - Info
> Coolant Flush
> DME Chip Installation
> Dash Replacement
> Engine Identification
> Engine Production
> Fuel Level Sender
> KLA Strut Brace Installation - 924S, 944, 968
> Koni Strut Conversion - 8641-1414S for late 944, 968
> Motor Mount Replacement
> Odometer Gear Replacement - late 944
> Oil Cooling, Auxiliary
> Oil Pressure Relief Valve
> Oil Pressure Sending Unit Replacement
> Rear Ride Height Adjustment
> Porsche Chronology
> Rear Spring Rates vs. Effective Rates
> Rear Wheel Bearing Diagnosis
> Rear Wheel Bearing Replacement - 924, early 944
> Rear Wheel Bearing Replacement - late 944, 968
> Ride Height Measurement
> Rod Bearing Replacement
> Shift Lever Rebuild
> Short Shift Kit
> Throttle Position Sensor
> Sway Bars - Info
> Torque Tube Rebuild
> Torsion Bar Replacement
> Transaxle Fluid - Info
> Transaxle Fluid Change
> Rear Sway Bar Installation
> Transaxle Replacement
> Heater Clip
> Window Regulator Replacement
> Seat Back Brace Installation Instructions
> KLA Strut Brace Installation - 968/944 S2/944 S
|
|
