|
Procedure:
- Raise care on lift or place on jack stands. Make sure car is safely and securely supported, and you have plenty of room to see around the transaxle.
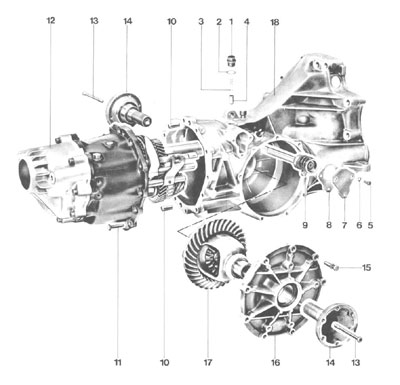
- Locate the shifter assembly on the top left (driver's side) of the transaxle, just behind the left half shaft (diagram 3)
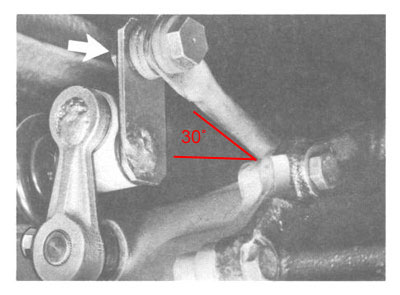
- Remove the stock shifter linkage as follows: Remove the 13mm bolt which connects the shifter shaft, which runs along the top of the transmission, to the shift linkage assembly. It will be hidden under a rubber boot. Next, Remove the 10mm bolt which connects the linkage to the selector shaft (#9, diagram 1) which runs through the ball joint of the linkage assembly that is held with a 13mm nut (arrow, diagram 2). Remove linkage. Follow the rod, which you unbolted, down to where it is bolted to the transaxle. Push up on this rod so that it bends at the transmission and forms a 30 degree angle (diagram 2).
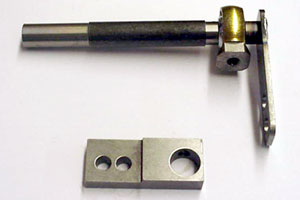
- Your Weltmeister Quick Shifter is now ready to be installed and adjusted to suit your driving style. Use the original hardware with Red Loctite (R) (supplied with kit). For a very quick side-to-side action install the ball joint bolt in the top slot of the steel plate. By using the lower slot you will slow the side-to-side action. The fore and aft motion is also adjustable. Position the 8mm Allen bolt which secures the heim joint in the lower hole for the shortest fore and aft motion of the shift lever (about a 45% reduction). By using the upper hole you will have a 25% reduction from stock. When tightening the heim joint, make sure it is parallel with the aluminum arm. This provides the full travel necessary for proper shifting. Failure to position the heim joint correctly will result in shifting problems.
NOTE: We recommend starting with the longer shifting pattern. The shorter position is radically shorter, and not always appropriate for street use.
- Adjust the shift linkage:
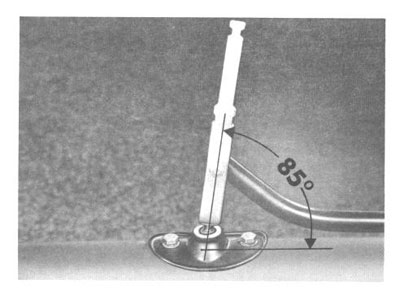
- Adjust Shift lever to an inclination of 85 degrees by moving the shift lever console (diagram 4). Shift lever should be in neutral for this adjustments.
- Shift lever in neutral. In this position a spring will hold the lateral selector shaft in the center shift plane (3rd and 4th gear). When shift is adjusted correctly, the shift lever will not have lateral inclination. Adjustments are made on the intermediate shift lever for joint rod.
- Double check and make sure all bolts are properly torqued and Loctited. After 10,000 miles of use, the heim joint in the quick shifter linkage will need to be lubricated. Remove the 6mm Allen bolt securing it to the aluminum plate and pack some grease into the hole on the lower side.
- Test drive the car. Some changes in the adjustment of side-to-side and throw distance may be needed to decide what setup best suits your needs.
Applications: All 924S, 944, 944S, 944S2, 944 Turbo
Tools: Floor jack and jack stands, Basic hand tools - wrenches/ratchet/sockets/etc...
Parts: Short Shift Kit - click here to shop
Illustrations:

WARNING: If these instructions are not followed carefully, it is quite possible to do extensive damage to your transmission. Read these instructions carefully and be certain that all steps are understood. Familiarize yourself with all diagrams. Then, before beginning installation, reread these instructions entirely.
| Related Articles |
> Window Express Kit Installation
> AC Delete
> Accusump Installation
> Adjustable Ride Height Kit - Paragon
> Alternator Replacement
> Brakes, front - 924S, 944, 944S
> Brey-Krause Strut Brace Installation - 944
> Camber Plate Installation (Paragon)
> Clock/Bulb Replacement, digital, Late 944 and 968
> Clutch Replacement - Part One
> Clutch Replacement - Part Two
> Clutch Slave Bleeder Valve Remote
> Control Arm Bushing Upgrade - Weltmeister
> Control Arm, Front - Info
> Coolant Flush
> DME Chip Installation
> Dash Replacement
> Engine Identification
> Engine Production
> Fuel Level Sender
> KLA Strut Brace Installation - 924S, 944, 968
> Koni Strut Conversion - 8641-1414S for late 944, 968
> Motor Mount Replacement
> Odometer Gear Replacement - late 944
> Oil Cooling, Auxiliary
> Oil Pressure Relief Valve
> Oil Pressure Sending Unit Replacement
> Rear Ride Height Adjustment
> Porsche Chronology
> Rear Spring Rates vs. Effective Rates
> Rear Wheel Bearing Diagnosis
> Rear Wheel Bearing Replacement - 924, early 944
> Rear Wheel Bearing Replacement - late 944, 968
> Ride Height Measurement
> Rod Bearing Replacement
> Shift Lever Rebuild
> Throttle Position Sensor
> Sway Bars - Info
> Torque Tube Rebuild
> Torsion Bar Replacement
> Transaxle Fluid - Info
> Transaxle Fluid Change
> Rear Sway Bar Installation
> Transaxle Replacement
> Heater Clip
> Window Regulator Replacement
> Seat Back Brace Installation Instructions
> KLA Strut Brace Installation - 968/944 S2/944 S
|
|
