|
Author: Skip
Location:
- 924S - located under the steering column - remove the four 8mm nuts holding it in.
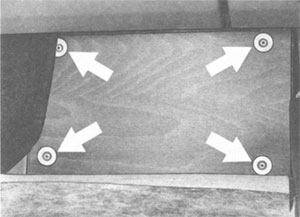
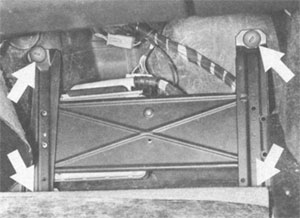
- 85.5-91 944, 968 - located in the passenger-side foot well, behind the carpet and kick-plate - remove the kick-plate and retaining frame, then remove the DME from the retaining frame.
Procedure:
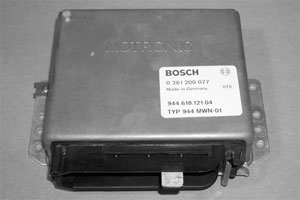
- Remove DME from car:
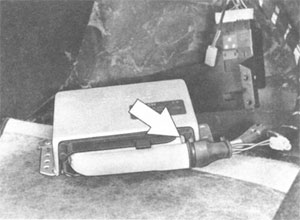
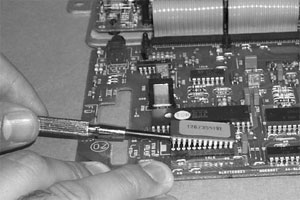
- Use a small flat screwdriver to pry the tabs up from around the DME case:
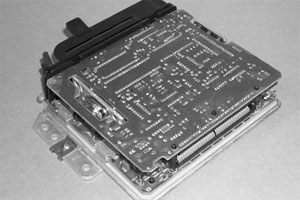
- Separate circuit boards by using a small screwdriver to pry the locking posts near the ribbon cable until they release:
- Lift the rear of the board until you can release the front from the locking tabs. Lat out the circuit boards so that the component surfaces are facing up:

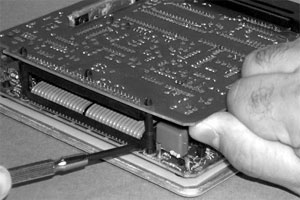
- The EPROM is located as shown here:
- Make note of the chip orientation (locate notch). Remove the chip by carefully prying underneath it with a small screwdriver. Lift a little from each side until the chip is loose:
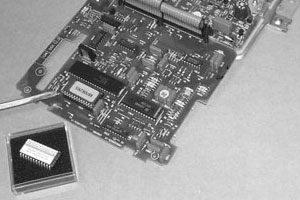
- Place the new chip onto the circuit card. Press firmly and evenly until the chip is fully seated:

- The rest of this installation is the reverse of removal.
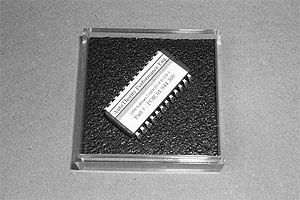
This article written specifically regarding an Autothority Performance Engineering DME EPROM Upgrade Chip Installation, but would apply to any DME chip installation.
***ESD Warning*** - The DME and EPROM are sensitive to Electrostatic Discharge. Handle the chip only by the body. Do not walk across shag carpet while rubbing a balloon against your head then roll in Styrofoam peanuts before handling ;-)
Application: 924S, 85.5-91 944, 968 (or any with removable EPROM)
Tools: General tools, jeweler's screwdriver
Credits: Skip Grehan
| Related Articles |
> Window Express Kit Installation
> AC Delete
> Accusump Installation
> Adjustable Ride Height Kit - Paragon
> Alternator Replacement
> Brakes, front - 924S, 944, 944S
> Brey-Krause Strut Brace Installation - 944
> Camber Plate Installation (Paragon)
> Clock/Bulb Replacement, digital, Late 944 and 968
> Clutch Replacement - Part One
> Clutch Replacement - Part Two
> Clutch Slave Bleeder Valve Remote
> Control Arm Bushing Upgrade - Weltmeister
> Control Arm, Front - Info
> Coolant Flush
> Dash Replacement
> Engine Identification
> Engine Production
> Fuel Level Sender
> KLA Strut Brace Installation - 924S, 944, 968
> Koni Strut Conversion - 8641-1414S for late 944, 968
> Motor Mount Replacement
> Odometer Gear Replacement - late 944
> Oil Cooling, Auxiliary
> Oil Pressure Relief Valve
> Oil Pressure Sending Unit Replacement
> Rear Ride Height Adjustment
> Porsche Chronology
> Rear Spring Rates vs. Effective Rates
> Rear Wheel Bearing Diagnosis
> Rear Wheel Bearing Replacement - 924, early 944
> Rear Wheel Bearing Replacement - late 944, 968
> Ride Height Measurement
> Rod Bearing Replacement
> Shift Lever Rebuild
> Short Shift Kit
> Throttle Position Sensor
> Sway Bars - Info
> Torque Tube Rebuild
> Torsion Bar Replacement
> Transaxle Fluid - Info
> Transaxle Fluid Change
> Rear Sway Bar Installation
> Transaxle Replacement
> Heater Clip
> Window Regulator Replacement
> Seat Back Brace Installation Instructions
> KLA Strut Brace Installation - 968/944 S2/944 S
|
|
