|
Author: Skip
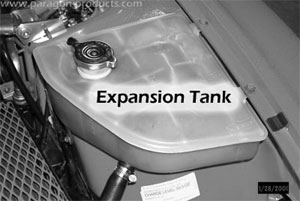
Got Milk? The coolant expansion tank on this series car can provide some warning signs of trouble deep within the engine. The oil cooler has seals that may break down over time and allow oil to seep into the coolant. A good indication that this has happened to you is a "milk-shake" in the expansion tank. With the engine cool, carefully remove the expansion tank cap. Inspect it, and the inside of the expansion tank. It will be fairly evident if something is awry, or, you can compare it to the picture of mine below which has this very problem. Don't panic yet. If you are not the original owner of this car, it may be that there was oil in the lines from a previous mishap that is still being collected in the tank. In my case it was caused by a previous engine. The new engine is fine, however, I still have a small amount of oil in the tank, galleys, and hoses. It will eventually work its' way completely out of the system (I hope).
If you are sure that it wasn't there the last time(s) you checked it then you may be headed for new oil cooler seals. In rare cases, this may be caused by a faulty head gasket.
There were quite a few differing opinions out there when I queried for technique. The following is what I've done, and it seems to work well:
- Lift front of car and place on Jack Stands.
- If engine is cool, remove the Expansion Tank cap.
- Place large catch pan under radiator.
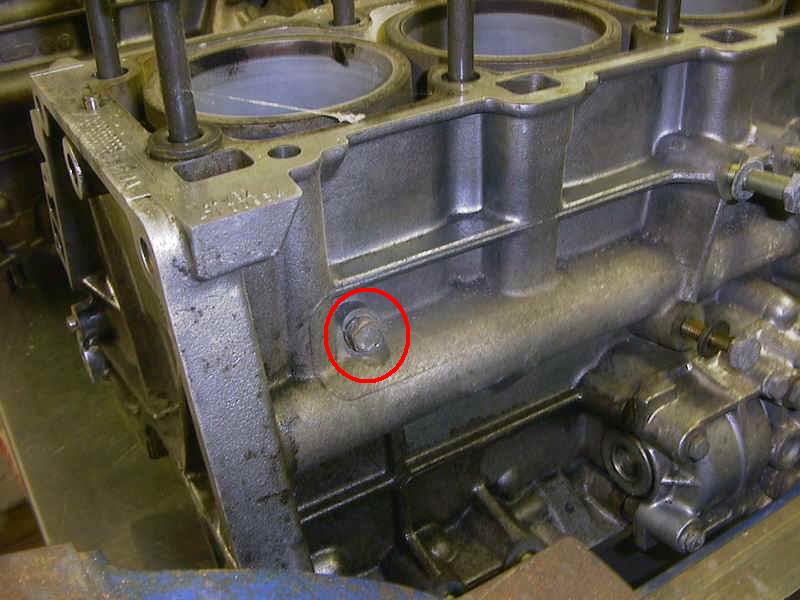
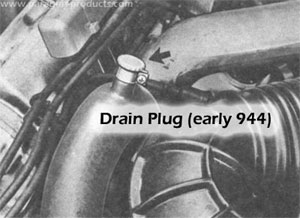
- Remove the lower radiator hose (right-bottom)(see illustration below). I was advised to do this rather than using the drain plug (see illustration below) due to stripping potential. There is another drain plug on the block below the header than can be removed (with great effort) but is not usually necessary (see illustration below).


- Allow the radiator to completely drain. Have a look at what came out to help determine the health of your engine. There should not be any chance of rust, as the entire engine and radiator are normally aluminum. If you have a measurable amount of oil in the coolant then you should investigate further. In my case, I had very nice looking fluid with no oil slick.
- Remove the expansion tank. It is held in place by 2 bolts in the fender ridge, and one nut at the lowest point inside the engine compartment (see illustration below). You'll also need to remove the 2 hoses with clamps on them. The overflow hose attached to the neck can remain. Try not to spill anti-freeze on any painted surfaces.
- Cleaning the expansion tank should be done each time the coolant is flushed. It is heavily baffled and scums up easily. Again, in my case I had to clean it thoroughly because of my Milk-Shake problem. There's no magic solvent to remove this that I've found or heard of. I used several soakings in Simple Green, a garden hose, and a bottle scrubber.
- Replace the expansion tank when clean and reattach all hoses.
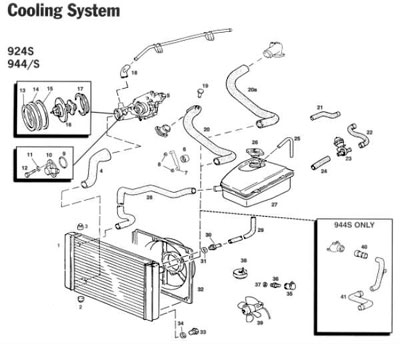
- Loosen the Bleed Plug located at the upper radiator feed outlet on the block (see illustration below). This allows air to escape from the lines at the highest point of the coolant system.

- Now it's time to flush... this is one of those "repeat until desired affect is achieved" type steps. Ensure lower radiator hose is replaced and tight. Fill system with water using the expansion tank (maybe add a little concentrated radiator flush... some folks don't like it though).
- In order to get the air "bled" out of the coolant system, you may have to squeeze the hoses to push the coolant into air pockets... allowing the air to escape through the bleed plug. Once you are fairly confident the system is properly bled, tighten the bleed plug and replace the expansion tank cap.
- Turn interior heat to full hot and fan to high. Start engine and let run for approximately 10 minutes. This will allow the engine to reach a temperature which will open the thermostat and complete the coolant loop.
- Allow the engine to cool sufficiently so you may safely remove the expansion tank cap.
- Remove the lower radiator hose to drain the system again.
- Now it's time to fill and bleed. Ensure lower radiator hose is replaced and tight.
- Loosen the Bleed Plug.
- Fill system with coolant using the expansion tank. Ensure the coolant you are using contains NO PHOSPHATES. This can be very bad on the aluminum and alloy components in your system. I used Prestone.
- The system will hold approximately 2 gallons of coolant. I added some Redline Water-Wetterto the mix to reduce engine temperature and further protect the system.
- Work the hoses and the bleed screw to remove as much air from the system as possible. Air trapped in the cooling system can cause all kinds of problems like slow warming and gurgling noises. For the engine it can cause uneven heating which can lead to real $$$ problems.
- Tighten the bleed plug and replace the expansion tank cap.
- Turn interior heat to full hot and fan to high. Start engine and let run for approximately 10 minutes. You may want to run with the tank cap off and rev the engine a little to see if there is air working its' way out.
- Ensure the coolant level is as prescribed and you are done. Some folks complain of air still being in the system after several attempts to bleed it out. I did not have that experience, so I cannot comment. I would recommend you check the hoses you altered for a few days and check the coolant level a few times thereafter.
Application: 924/944 all
Tools: 10mm Socket, 12mm Socket, Flat-blade or Phillips Screwdriver, Floor Jack, Jack Stands
Credits: Skip Grehan
| Related Articles |
> Window Express Kit Installation
> AC Delete
> Accusump Installation
> Adjustable Ride Height Kit - Paragon
> Alternator Replacement
> Brakes, front - 924S, 944, 944S
> Brey-Krause Strut Brace Installation - 944
> Camber Plate Installation (Paragon)
> Clock/Bulb Replacement, digital, Late 944 and 968
> Clutch Replacement - Part One
> Clutch Replacement - Part Two
> Clutch Slave Bleeder Valve Remote
> Control Arm Bushing Upgrade - Weltmeister
> Control Arm, Front - Info
> DME Chip Installation
> Dash Replacement
> Engine Identification
> Engine Production
> Fuel Level Sender
> KLA Strut Brace Installation - 924S, 944, 968
> Koni Strut Conversion - 8641-1414S for late 944, 968
> Motor Mount Replacement
> Odometer Gear Replacement - late 944
> Oil Cooling, Auxiliary
> Oil Pressure Relief Valve
> Oil Pressure Sending Unit Replacement
> Rear Ride Height Adjustment
> Porsche Chronology
> Rear Spring Rates vs. Effective Rates
> Rear Wheel Bearing Diagnosis
> Rear Wheel Bearing Replacement - 924, early 944
> Rear Wheel Bearing Replacement - late 944, 968
> Ride Height Measurement
> Rod Bearing Replacement
> Shift Lever Rebuild
> Short Shift Kit
> Throttle Position Sensor
> Sway Bars - Info
> Torque Tube Rebuild
> Torsion Bar Replacement
> Transaxle Fluid - Info
> Transaxle Fluid Change
> Rear Sway Bar Installation
> Transaxle Replacement
> Heater Clip
> Window Regulator Replacement
> Seat Back Brace Installation Instructions
> KLA Strut Brace Installation - 968/944 S2/944 S
|
|
